Thursday, December 14, 2017

How to solve “WebForms UnobtrusiveValidationMode requires a ScriptResourceMapping for jQuery. Please add a ScriptResourceMapping named jQuery(case-sensitive)”


Error: “WebForms UnobtrusiveValidationMode requires a ScriptResourceMapping for jQuery. Please add a ScriptResourceMapping named jQuery(case-sensitive)


This error comes when we use RequiredFieldValidator control on any other server control in asp.et web applictaion. We can solve this error by enabling pre 4.5 validation mode by adding an appsetting key in web.config.


 <appSettings>
    <add key="ValidationSettings:UnobtrusiveValidationMode" value="None" />
  </appSettings>


What happened when we add this key?


Adding this key specifies how ASP.NET globally enables the built-in validator controls to use unobtrusive JavaScript for client-side validation logic. As said here

Remarks: If this key value is set to "None" [default], the ASP.NET application will use the pre-4.5 behavior (JavaScript inline in the pages) for client-side validation logic. If this key value is set to "WebForms", ASP.NET uses HTML5 data-attributes and late bound JavaScript from an added script reference for client-side validation logic.


Tuesday, December 5, 2017

Using PowerShell to list COM+ application and the identity on which they run

Blow PowerShell script will list down the com+ application running on your machine and the identity on which they run

$comAdmin = New-Object -com ("COMAdmin.COMAdminCatalog.1")
$applications = $comAdmin.GetCollection("Applications")
$applications.Populate()
foreach ($application in $applications)
{
    $application.Value("Name") + " " + $application.Value("Identity")
}


How to convert a josn array to object array in JavaScript.


To accomplish the same we could get use of the $.map function


Below code snippet will convert  the json in jsondata variable to JavaScript array


You can see the result in the console screen of browser.

var o = [{"Rating":"Negative","Value":1.0},{"Rating":"Neutral","Value":1.0},{"Rating":"Postive","Value":3.0}];

var arr = $.map(o, function(el) { return [[el.Rating,el.Value]]; })

console.log(arr)

https://jsfiddle.net/92e03nqu/

Asp.net MVC how to populate dropdown list with numbers

Below Razor code will populate a dropdown with  numbers  from 1 to 10


@Html.DropDownListFor(=> m.BookRetensionDays, Enumerable.Range(1, 10).Select(rd => new SelectListItem { Text = rd.ToString(), Value = rd.ToString() }))

Thursday, October 26, 2017

How to Login to Azure using PowerShell?

The Azure PowerShell cmdlets support two authentication techniques: AAD (Azure Active Directory) and self-signed X.509 certificates. AAD authentication can be used for both the classic Azure Service Management (ASM) mode and the new Azure Resource Manager (ARM) mode of the Azure. Certificate authentication can be used only for ASM mode.

Here we will using AAD to get into our Azure subscription. For this to work you should be an Administrator or Co-administrator for relevant subscription. More info related to Azure Access rights can be found here  http://rajeshkamalakshan.blogspot.in/2017/08/managing-azure-subscriptions-and-access.html .

If you don’t have AAD module installed then the same can be installed as below

In Powershell Run

Install-Module AzureAD

Once the above module is installed run the below command in power shell. This cmdlet prompts you for the login credentials for your Azure account. After logging in, it downloads your account settings so they are available to Azure PowerShell.

Add-AzureAccount

Once logged in successfully , if necessary, the following Azure cmdlets can be used to select the desired subscription

Get-AzureSubscription
Select-AzureSubscription -SubscriptionName "SomeSubscription"

There are other ways to login to Azure subscription  by using  Login-AzureRmAccount. This will work only forAzure Resource Manager”(ARM).but the above approach works for both ASM and ARM

More Reading

Wednesday, August 9, 2017

Managing Azure Subscriptions and Access Rights

What is Azure Subscription
A Windows Azure subscription grants you access to Windows Azure services and to the Windows Azure Platform Management Portal. It’s also called as an active agreement with Microsoft which is needed to provision resources in Microsoft Azure. 
A Windows Azure subscription has two aspects:
  • The Windows Azure account, through which resource usage is reported and services are billed.
  • The subscription itself, which governs access to and use of the Windows Azure services that are subscribed to. The subscription holder manages services (Windows Azure , SQL Azure, Storage etc)  through the Windows Azure Platform Management Portal
Azure subscription are managed using admin accounts . there are three types of admin accounts


Administrative role Limit Description
Account Administrator (AA) 1 per Azure account This is the person who signed up for or bought Azure subscriptions, and is authorized to access the Account Center and perform various management tasks. These include being able to create subscriptions, cancel subscriptions, change the billing for a subscription, and change the Service Administrator.
Service Administrator (SA) 1 per Azure subscription This role is authorized to manage services in the Azure portal. By default, for a new subscription, the Account Administrator is also the Service Administrator.
Co-administrator (CA) in the Azure classic portal 200 per subscription This role has the same access privileges as the Service Administrator, but can’t change the association of subscriptions to Azure directories.

Each Azure subscription is associated with one Azure Active Directory (AD) directory. Users, groups, and applications from that directory can manage resources in the Azure subscription. Assigning of  these access rights are done through Azure portal, Azure command-line tools, and Azure Management APIs.
This document emphasizes on managing rights through Azure Portal.

Resource hierarchy and access inheritance
·         Each subscription in Azure belongs to only one directory. (But each directory can have more than one subscription.)
·         Each resource group belongs to only one subscription.
·         Each resource belongs to only one resource group.


To  find the Default Directory the subscription is associated with, go to the Azure classic portal, select Settings > Subscriptions.


To view Azure billing information and manage subscriptions, you must sign in to the Account Center as the Account Administrator.

Click on the “ACCOUNT CENTER” to manage subscription 


Click on the “add subscription” to create new subscription 


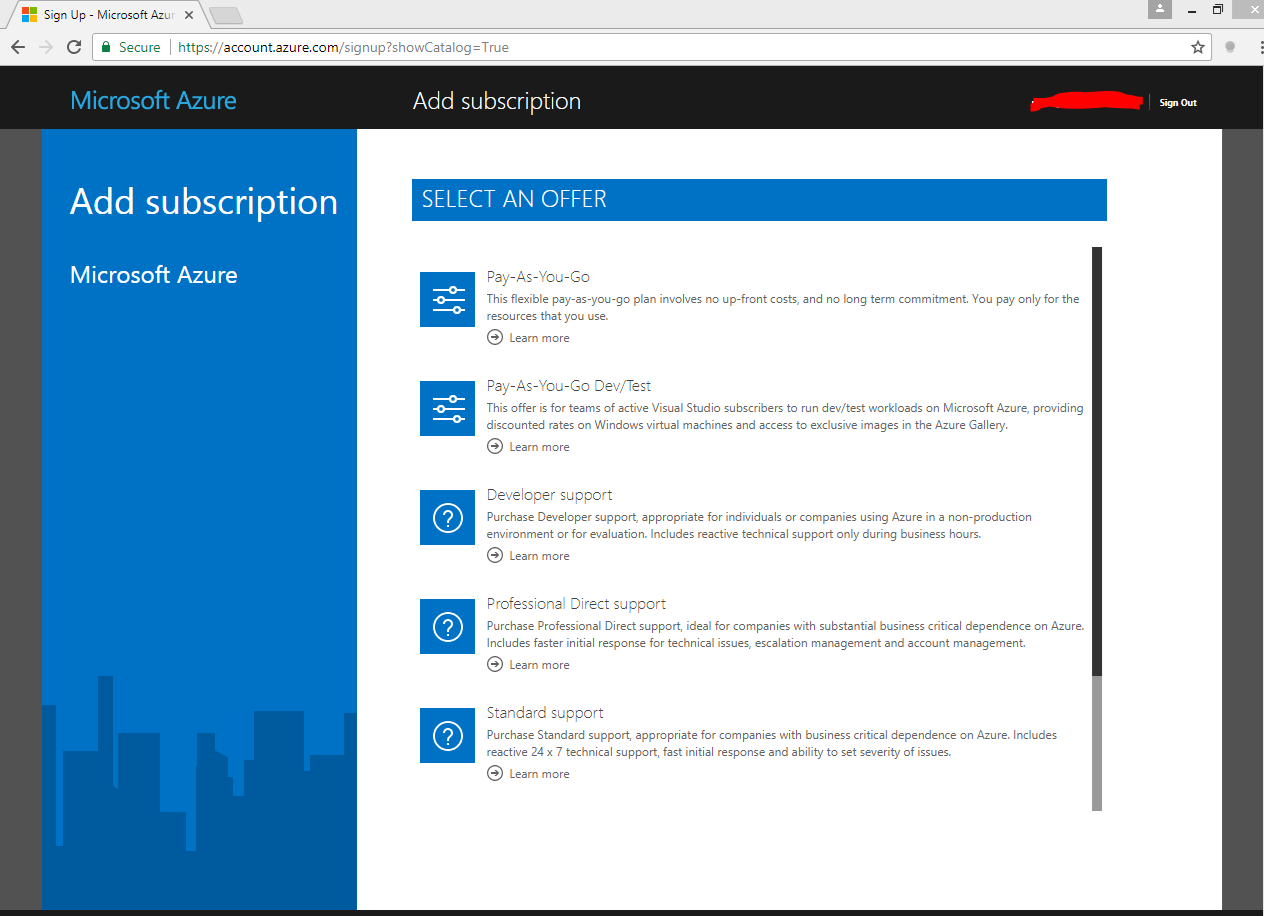
Click on the  appropriate subscription type to create one.


Azure RBAC has three basic roles that apply to all resource types:
·         Owner has full access to all resources including the right to delegate access to others.
·         Contributor can create and manage all types of Azure resources but can’t grant access to others.
·         Reader can view existing Azure resources.

The rest of the RBAC roles in Azure allow management of specific Azure resources. For example, the Virtual Machine Contributor role allows the user to create and manage virtual machines. It does not give them access to the virtual network or the subnet that the virtual machine connects to. A full list of roles can be found here https://docs.microsoft.com/en-us/azure/active-directory/role-based-access-built-in-roles

If required we can also build custom roles as described here  https://docs.microsoft.com/en-us/azure/active-directory/role-based-access-control-custom-roles

Access Rights are granted by assigning the appropriate RBAC (Resource Based Access Control) role to users, groups, and applications at a certain scope. The scope of a role assignment can be a subscription, a resource group, or a single resource. A role assigned at a parent scope also grants access to the children contained within it. For example, a user with access to a resource group can manage all the resources it contains, like websites, virtual machines, and subnets.

Azure Role-Based Access Control (RBAC) enables fine-grained access management for Azure. Using RBAC, you can grant only the amount of access that users need to perform their jobs. Within each subscription, you can grant up to 2000 role assignments.

Managing Access Aright through Subscriptions
  •        Go to Azure Portal
  •        Select Subscription in the navigation bar on the left.
  •        Select the name of the Subscription from the Subscription blade
  •        Select Access control (IAM) from the left menu.
  •        The Access control blade lists all users, groups, and applications that have been granted access to the Subscription.
  •        Note: Some roles are scoped to This resource while others are Inherited it from another scope. Access is either assigned specifically to the resource group or inherited from an assignment to the parent subscription.
  •        Select Add on the Access control blade.
  •        Select the role that you wish to assign from the Select a role blade.
  •        Select the user, group, or application in your directory that you wish to grant access to. You can search the directory with display names, email addresses, and object identifiers.
  •  
To Remove Access right
  •        Hover your cursor over the name of the assignment that you want to remove. A check box appears next to the name.
  •        Use the check boxes to select one or more role assignments.
  •        Select Remove.
  •        Select Yes to confirm the removal.
  •        Note : Inherited assignments cannot be removed. If you need to remove an inherited assignment, you need to do it at the scope where the role assignment was created.  In the Scope column, next to Inherited there is a link that takes you to the resources where this role was assigned. Go to the resource listed there to remove the role assignment.


Managing Access Aright through Resource Group

  •          Go to Azure Portal
  •          Select Resource groups in the navigation bar on the left.
  •          Select the name of the resource group from the Resource groups blade
  •          Select Access control (IAM) from the left menu.
  •          The Access control blade lists all users, groups, and applications that have been granted access to the resource group.
  •          Note: Some roles are scoped to This resource while others are Inherited it from another scope. Access is either assigned specifically to the resource group or inherited from an assignment to the parent subscription.
  •        Select Add on the Access control blade.
  •        Select the role that you wish to assign from the Select a role blade.
  •        Select the user, group, or application in your directory that you wish to grant access to. You can search the directory with display names, email addresses, and object identifiers.
a


To Remove Access right
  •        Hover your cursor over the name of the assignment that you want to remove. A check box appears next to the name.
  •        Use the check boxes to select one or more role assignments.
  •        Select Remove.
  •        Select Yes to confirm the removal.
  •        Note : Inherited assignments cannot be removed. If you need to remove an inherited assignment, you need to do it at the scope where the role assignment was created.  In the Scope column, next to Inherited there is a link that takes you to the resources where this role was assigned. Go to the resource listed there to remove the role assignment.


Monday, July 24, 2017

How to enable single sign on for your application


The  first step for this is to Register your application with your Azure Active Directory tenant. There a good article  @ docs.microsoft.com which explains this. Please have a look here  https://docs.microsoft.com/en-us/azure/active-directory/active-directory-app-registration

Wednesday, June 21, 2017

How to compare two folders in PowerShell by excluding some folders from source or destination

Today I  just came across a scenario where which I need bit to exclude some folder inside my parent folders while doing a comparison. I know there is  - Exclude for Get-ChildItem , but unfortunately this seems not working good for folders /file together and my scenario.

Finally  found a way to do this by using the below code, which exclude any folders in the regular expression.

Assume we have a folder  structure as below and we want to compare  “C:\ Source” and “D:\ Destination” recursively by excluding the files in D:\ XXXXXX and D:\ YYYYYY with any difference in XXXXXX.txt to be picked up.

C:
|Source
          |-XXXXXX
          |                 |File1.txt
          |                 |File2.txt
          |                 |File3.txt
          |-FolderA
          |                 |File4.txt
          |                 |File5.txt
          |                 |File6.txt
          |-FolderB
          |                 |File1.txt
          |                 |File2.txt
          |                 |File3.txt
          |- YYYYYY
          |                 |File1.txt
          |                 |File2.txt
          |                 |File3.txt
          |- XXXXXX.txt

 
D:
|Destination
          |- XXXXXX
          |                 |File1.txt
          |                 |File2.txt
          |                 |File3.txt
          |                 |File4.txt
          |-FolderA
          |                 |File4.txt
          |                 |File5.txt
          |                 |File6.txt
          |-FolderB
          |                 |File1.txt
          |                 |File2.txt
          |                 |File3.txt
          |- YYYYYY
          |                 |File1.txt
          |                 |File2.txt
          |                 |File3.txt
          |                 |File4.txt
          |- XXXXXX.txt

Below  code will fulfill the requirements. This will compare the source and destination folders by excluding any folders with name XXXXXX and YYYYYY. But this will also pick up any changes to files with same name in regular Expression Eg  XXXXXX.txt or YYYYYY.txt

Clear

#Arrive at the hash of destination folder by excluding the folders in regular expression "\w*\\XXXXXX\\\w*|\w*\\YYYYYY\\\w*"
$hashDestination=Get-ChildItem -Path "D:\temp\Destination" -Recurse | where {$_.FullName -notmatch  "\w*\\XXXXXX\\\w*|\w*\\YYYYYY\\\w*"  } |Get-FileHash -Algorithm "SHA256"

#Arrive at the hash of Source folder by excluding the folders in regular expression "\w*\\XXXXXX\\\w*|\w*\\YYYYYY\\\w*"
$hashSource=Get-ChildItem -Path "D:\temp\Source" -Recurse | where {$_.FullName -notmatch  "\w*\\XXXXXX\\\w*|\w*\\YYYYYY\\\w*"  } |Get-FileHash -Algorithm "SHA256"

$diff = 0
#Compare the hash we got  and increment $diff if we have a difference
Compare-Object -ReferenceObject $hashSource.Hash -DifferenceObject $hashDestination.Hash | % { If ($_.Sideindicator -ne " ==") {$diff+=1} }

#Check if $diff not equal to zero
If($diff -ne 0)
{
    #If yes, we have a difference
    return $true
}
else
{
    #If yes, we have a difference
    return $false
}

A much  mature version of the same logic can be found below. Which encapsulate the logic in reusable function Compare-Folders

clear
function Compare-Folders
{
    param(
        #Source Path Eg: "D:\temp\Source"
        $Source,
        #Destination Path Eg: "D:\temp\Destination"
        $Destination,
        #Regular Expression for Folder Exclusion Eg:"\w*\\YYYYYY\\\w*|\w*\\XXXXXX\\\w*"
        $ExcludeList
    )

    #Arrive at the hash of Source folder by excluding the folders in regular expression "\w*\\XXXXXX\\\w*|\w*\\YYYYYY\\\w*"
    $hashSource = Get-ChildItem -Path  $Source -Recurse | where {$_.FullName -notmatch  $ExcludeList  } |Get-FileHash -Algorithm "SHA256"

    #Arrive at the hash of destination folder by excluding the folders in regular expression "\w*\\XXXXXX\\\w*|\w*\\YYYYYY\\\w*"
    $hashDestination  = Get-ChildItem -Path  $Destination -Recurse | where {$_.FullName -notmatch  $ExcludeList  } |Get-FileHash -Algorithm "SHA256"

    $diff = 0
    #Compare the hash we got  and increment $diff if we have a difference
    Compare-Object -ReferenceObject $hashSource.Hash -DifferenceObject $hashDestination.Hash | % { If ($_.Sideindicator -ne " ==") {$diff+=1} }

    #Check if $diff not equal to zero
    If($diff -ne 0)
    {
        #If yes, we have a difference
        return $true
    }
    else
    {
        #If yes, we have a difference
        return $false
    }
}

 
$SourceFolder="D:\temp\Source"
$DestinationFolder="D:\temp\Destination"
#Compare the folders using the function
if(Compare-Folders -Source $SourceFolder -Destination $DestinationFolder -ExcludeList "\w*\\YYYYYY\\\w*|\w*\\XXXXXX\\\w*")
{
    Write-Host "Changes Found"
}
else
{
    Write-Host "No Changes Found"
}